# Welcome To Xploit Docs
### Ready to get started? You're in the right place.
Here you’ll find clear, step-by-step guides to help you make the most out of our products. Whether you're a first-time user or looking to master advanced features, this documentation will walk you through everything you need.
Need help or want to connect with the community?\
Join our official [Discord server](https://discord.gg/xploit) for support, updates, and exclusive resources.
# Game Accounts
{% embed url="" %}
Full documentation for game accounts
{% endembed %}
# Matrix Internal Pro
Requirements (IMPORTANT)
#### Disable Antivirus
Navigate to Virus & Threat protection (Windows Search > Virus & Threat Protection > Manage Settings )\
\\
**Install Defender Control**
Download[ ](https://www.sordum.org/files/downloads.php?st-defender-control)dControl [here](https://www.sordum.org/files/downloads.php?st-defender-control)
Unzip the file (Password: sordum)
Run dControl.exe as Administrator
Click on Disable Windows Defender
#### Install Required Files
Loader Setup
#### Loader Download:
{% embed url="" %}
* Make sure the game is completely closed before running the loader.
* Launch the loader and enter your key.
* Wait until the loader prompts you to re-enter your key, then input it again.
* When the loader displays **“Press any key to inject when in-game...”**, launch the game — do not open the game before this step.
* After you’re in the game lobby or have started a match, switch back to the loader and press any key to inject.
* Once the injection is successful, press **Insert** to open or close the menu.
# Xploit External
Loader PRE- SETUP (IMPORTANT)
### Disable Windows Anti Virus
* Navigate to Virus & Threat protection\
(Windows Search > Virus & Threat Protection > Manage Settings )\

* Navigate to Firewall & Network Protection Settings\
(Windows Search > Firewall & Network Protection > Turn All Three Off)

* Navigate to App & Browser Control\
(Windows Search > App & Browser Control > Reputation-Based Protection Settings > Turn off all four )\

#### Install Defender Control
Download winrar [here](https://www.win-rar.com/predownload.html?\&L=0) & run it
Download[ ](https://www.sordum.org/files/downloads.php?st-defender-control)dControl [here](https://www.sordum.org/files/downloads.php?st-defender-control)
Unzip the file (Password: sordum)
Run dControl.exe
Disable Windows Defender
Loader Setup
#### [LOADER DOWNLOAD CLICK HERE](http://rustloader.wtf/)
1. Download Visual C++ Redistributables [here](https://www.techpowerup.com/download/visual-c-redistributable-runtime-package-all-in-one/)
2. Download dxwebsetup [here](https://download.microsoft.com/download/1/7/1/1718ccc4-6315-4d8e-9543-8e28a4e18c4c/dxwebsetup.exe)
3. Download Tor Browser [here](https://www.torproject.org/download/) & connect
4. Launch Loader
5. If loader says “Please Launch **Overwolf or Nvidia App**”, download **Overwolf** or **Nvidia App** and run it\
[Click here for Overwolf](https://download.overwolf.com/install/Download) & [Click here for Nvida App](https://uk.download.nvidia.com/nvapp/client/11.0.6.383/NVIDIA_app_v11.0.6.383.exe)
6. Rust will Automatically launch as long as you are logged into Steam, Enjoy!
# Fluent Internal
Download the Loader
* URL: [fluent.gg/loader.exe](https://fluent.gg/loader.exe)
* **Important:** Save the loader directly to a USB drive. Running it from another location may result in a ban.
### Pre-Launch Requirements
#### Before You Begin
* Disable antivirus before downloading the loader.
* Fast Boot must be disabled.
* Unplug the USB drive before launching the game.
* Only inject once per system restart.
* If using a DMA card, unplug it before launching the game.
* Secure Boot must be disabled in BIOS.
#### System Requirements
* Windows 10 or 11 (No Insider/Preview builds or custom ISOs).
* 64-bit CPU with AVX support.
* Fast Boot disabled.
* No active hypervisors (Hyper-V or other virtual machines).
* Antivirus fully disabled.
* Administrator rights required.
* Secure Boot disabled.
### Chrome Download Setup (Optional)
To prompt download location every time:
1. Open Chrome Settings.
2. Navigate to Downloads.
3. Enable: "Ask where to save each file before downloading."
### Disabling Fast Boot
1. Open Control Panel > Power Options.
2. Click "Choose what the power button does."
3. Click "Change settings that are currently unavailable."
4. Uncheck "Turn on fast startup (recommended)."
5. Click Save changes and restart your PC.
> Note: If the option is missing, Fast Boot may already be disabled via BIOS.
### Required Tools
#### Defender Control
* Download from:
* Unzip password: `sordum`
* Run `dControl.exe` and click "Disable Defender."
### Using the Loader
#### Injection Steps
1. Close the game completely.
2. Run the loader as Administrator from the USB drive.
3. Log in or create an account.
4. Select a product and verify status/expiration.
5. Click "Inject."
6. Wait for the loader to close.
7. Unplug the USB drive.
8. Launch your game.
#### Activating a License Key
1. Run the loader from the USB drive as Administrator.
2. Log in or register.
3. Paste your license key (no extra spaces).
4. Click "Activate Key."
### Rust-Specific Instructions
#### Menu Not Showing
* Ensure both Steam and Rust are installed on the system drive (C:).
* Use Steam’s guide to move games if needed.
#### Getting Banned Often
* Reinstall Windows using an official ISO.
* Run Defender Control before re-downloading or injecting.
### Disabling Hypervisors
#### Official Hypervisors (e.g., Hyper-V)
1. Open Command Prompt as Administrator.
2. Run:
```
bcdedit /set {current} hypervisorlaunchtype off
```
3. Restart your PC.
#### Unofficial Hypervisors
* Disable virtualization in BIOS.
* Refer to your hypervisor’s documentation for full removal steps.
### Disabling Secure Boot
To disable Secure Boot:
1. Restart your PC and enter BIOS (commonly F1–F4 during startup).
2. Locate the "Secure Boot" setting.
3. Change it to "Disabled."
4. Save and exit BIOS.
### Common Errors & Fixes
#### Error: 0xc01c0013
* Ensure UAC and file virtualization are enabled.
* Run registry fix or batch file as Admin.
* Restart your PC.
* On Windows Home:
* Press Windows + R → type `secpol.msc`
* Go to Local Policies > Security Options
* Enable:
* "User Account Control: Virtualize file and registry write failures to per-user locations."
#### Error: 0xc00000bb
* Your Windows version is not supported.
* Reinstall using an official Windows ISO.
#### Errors: 0xc0000365, 0xc0000906, 0xc0000907, 0xc000009a, 0xc0000022, 0xc000004e
* Uninstall anti-cheats: FaceIT, Vanguard, ESEA.
* Restart your PC.
* Disable antivirus.
* If issues persist, reinstall Windows.
#### Error: 0xc0000428
* Disable Secure Boot in BIOS (see section above).
### Using Third-Party HWID Spoofers
1. Run and log into the loader.
2. Run your external HWID spoofer.
3. When prompted about internal spoofing, click "No."
4. Launch your game.
# Mystic External
Requirements (IMPORTANT)
### Disable Antivirus
Navigate to Virus & Threat protection (Windows Search > Virus & Threat Protection > Manage Settings )\

**Install Defender Control**
Download[ ](https://www.sordum.org/files/downloads.php?st-defender-control)dControl [here](https://www.sordum.org/files/downloads.php?st-defender-control)
Unzip the file (Password: sordum)
Run dControl.exe as Administrator
Click on Disable Windows Defender
### Install Required Files
[https://www.microsoft.com/en-us/download/details.aspx?id=35 ](https://www.microsoft.com/en-us/download/details.aspx?id=35)Loader Setup
### Step 1:
Download the loader [using this link](https://uniqueloader.com/r6s/). The password for the archive is 123.
### Step 2:
Extract the files from the archive and place them in a separate folder. The folder name should be written in English letters, it is recommended to place this folder in the root of the C drive.
Run the cheat loader as administrator.
### Step 3:
Insert your key into the "Serial Key" field and click "Sign In".
After a short loading, you will see the R6S icon.
### Step 4:
Click the "**Start Injection Process**" button.
The message "**Please Open Rainbow Six Siege**" will appear, it's time to launch the game.\
**YOUR GAME NEEDS TO BE SET TO BORDERLESS MODE**
### Step 6:
When the game starts, press the "**Insert**" key while in the main menu.
* The cheat menu will appear in front of you. The key to close/open the menu is **Insert**.
# Unlock All
Requirements (IMPORTANT)
**Disable Antivirus**
Navigate to Virus & Threat protection (Windows Search > Virus & Threat Protection > Manage Settings )\
\\
**Install Defender Control**
Download[ ](https://www.sordum.org/files/downloads.php?st-defender-control)dControl [here](https://www.sordum.org/files/downloads.php?st-defender-control)
Unzip the file (Password: sordum)
Run dControl.exe as Administrator
Click on Disable Windows Defender
**Install Required Files**
Loader Setup
#### **Download The Tool**
* [Download Link](https://mega.nz/file/o702iTgJ#EOzhlG4hzoqlFqv10lQdvinWTdCK3TZlJCdQ_ELEBfc)
* Archive password: `123`
**Extract Files Properly**
1. Extract the contents of the archive.
2. Place all files in a folder named using **only English characters**.
***
#### Injecting into Rainbow Six Siege
**Launch the Tool**
1. Right-click `UnlockAll.exe`.
2. Select "Run as Administrator."
**Sign In**
* Enter your Serial Key.
* Click "Sign In."
**Start the Injection**
* Click "Start Injection Process."
* Wait for the injection to complete.
**Launch the Game**
* Open Rainbow Six Siege.
* Make sure you are running the **DirectX 12** version.
**Open the Cheat Menu**
* Press `Insert` to open or close the menu in-game.
#### Troubleshooting
**Game Crashing**
* Ensure all pre-injection steps are completed.
* Run the tool as Administrator.
* Close any conflicting background applications.
**Tool Not Launching**
* Confirm that Visual C++ Redistributables and DirectX are installed.
* Re-download the tool in case of corruption.
* Temporarily disable antivirus software if it is blocking the tool.
# Horux External
Requirements (IMPORTANT)
**Disable Antivirus**
Navigate to Virus & Threat protection (Windows Search > Virus & Threat Protection > Manage Settings )\
\\
**Install Defender Control**
Download[ ](https://www.sordum.org/files/downloads.php?st-defender-control)dControl [here](https://www.sordum.org/files/downloads.php?st-defender-control)
Unzip the file (Password: sordum)
Run dControl.exe as Administrator
Click on Disable Windows Defender
**Install Required Files**
Loader Setup
**Activating Your Key**
**1. Download the Loader**\
Get the loader from [undetect.net](https://undetect.net/loader_exodus).
**2. Disable Security Software**\
Turn off:
* Windows Defender
* Antivirus / firewall
* Windows password or PIN
This prevents conflicts with the loader.
**3. Run the Loader**
* Right-click → Run as Administrator
* On first launch, the loader may restart your PC a few times (this is normal)
* Keep focus on your main monitor
**4. Enter Your License Key**
* Right-click inside the loader → paste your key
* Press **Enter**
**5. Cleaner / Spoofer Options**
* Loader will ask if you want to use Cleaner and/or Spoofer
* If you purchased Spoofer only, it will ask only about Cleaner
***
**Troubleshooting**
* **AES not supported** → Enable AES in BIOS
* **Enable AHCI mode** → Switch disk mode in BIOS (disable IDE/RAID)
* **Black screen** → Update Windows to the latest build
* **Intel Rapid Storage (IRST)** → Disable in BIOS and uninstall related drivers/services (iaStor)
* **Incompatible HWID** → Request HWID reset via Discord/Telegram support
* **Loader crash / missing dependencies** → Install [Visual C++ Redistributable](https://aka.ms/vs/17/release/vc_redist.x64.exe)
* **Font error** → Download [ArialUnicodeMS.ttf](https://undetect.net/data/ArialUnicodeMS.ttf) and place it in `C:\Windows\Fonts`
# Sprite External
Requirements (IMPORTANT)
#### Disable Antivirus
Navigate to Virus & Threat protection (Windows Search > Virus & Threat Protection > Manage Settings )\
\\
**Install Defender Control**
Download[ ](https://www.sordum.org/files/downloads.php?st-defender-control)dControl [here](https://www.sordum.org/files/downloads.php?st-defender-control)
Unzip the file (Password: sordum)
Run dControl.exe as Administrator
Click on Disable Windows Defender
#### Install Required Files
### Errors
> **Error: Please launch SteelSeries moment overlay(FOR GEFORCE).**
\- Solution: Disabled and Enabled GeForce overlay.
> **Error: Please launch SteelSeries Sonar overlay(FOR STEELSERIES).**
\- Solution: You need to press the SONAR's bind before launching so that the overlay works.
> **Error: If there is a flicker of menus or black screens in the game.**
\- Solution: Open SteelSeries -> Settings -> MOMENTS -> Capture and sound -> Turn off "ALLOW MOMENTS TO CAPTURE WHILE GAMING".
> **Error: Please disable Intel Rapid Storage Technology.**
\- Solution: RST must be disabled. Instructions for disabling:
> **Error: The bind button does not work.**
\- Solution: Reinject, if it does not help, you need to run the overlay as an administrator.
> **Error: If no menu appears in the game or the loader closes immediately after opening.**
\- Solution: install the library from the link -
> **Error: Unsupported Frimware.**
\- Solution: You need to convert the disk to GPT and the BIOS to UEFI.
> **Error: 0x296.**
\- Solution: Need reinject.
> **Error: Unknown network error.**
\- Solution: Problem with your internet connection, you need to check your connection and try again, maybe you are using VPN.
> **Error: Failed to allocate memory/to map memory (x) Please reboot pc and try again.**
\- Solution: The driver was installed incorrectly, you need to reboot the pc and try again(If you are in an internet cafe but the error is recurring, you need to try another PC). If it doesn't help, clean the autorun programs. If the error still persists, we recommend downloading Autoruns - and disabling all programs that are in the startup list but are not system programs. In some cases, drivers for deleted programs may remain in the system.
> **Error: Failed to load dependencies(x)(-x) Make sure all antiviruses are disabled.**
\- Solution: You need to turn off all protection and remove all anti-readers and antiviruses from your PC. If it doesn't help, clean the autorun programs.
> **Error: Please uninstall Vanguard/Faceit first.**
\- Solution: You need to uninstall the Vanguard/Faceit antichip from your PC and try again.
> **Error: AES instruction set is not supported.**
\- Solution: This error means the processor does not support AES instruction set, so it cannot be fixed.
> **Error: Please enable Intel VT-X/AMD-V in the BIOS.**
\- Solution: To fix this error, enter the BIOS and search for a feature named either "Intel virtualization technology" or "Intel VT-X"/"AMD-V" or "SVM mode" and enable it.
> **Error: VMX/SVM is not supported.**
\- Solution: To fix this error, go to "Control Panel" -> "Programs and Functions" -> "Enable or disable Windows Functions" and make sure that "Virtual Machine Platform" and "Hyper-V" are disabled.
If the error persists, open cmd as an administrator and enter the following command without quotes "bcdedit /set hypervisorlaunchtype off", then press Enter and restart the computer.
If the Windows 11 user and the previous methods did not help him, then you should run PowerShell as an administrator and paste the following command there (in full):
*takeown /F "C:\Windows\System32\hvix64.exe"*\
*icacls "C:\Windows\System32\hvix64.exe" /grant \*$((\[System.Security.Principal.WindowsIdentity]::GetCurrent()).User.Value):For*\
*takeown /F "C:\Windows\System32\hvax64.exe"*\
*icacls "C:\Windows\System32\hvax64.exe" /grant \*$((\[System.Security.Principal.WindowsIdentity]::GetCurrent()).User.Value):F*\
*del "C:\Windows\System32\hvix64.exe"*\
*del "C:\Windows\System32\hvax64.exe"*
> **Error: Either virtual or RAID disk is present. Please revert it back to normal state.**
\- Solution: Turn off the spoofer or turn off the RAID in the BIOS settings with a complete reinstallation of Windows.
> **Error: Unsupported firmware.**
\- Solution: To fix this error, convert the disk containing the operating system to GPT format using the mbr2gpt tool built into Windows or any other disk management utility of your choice. The BIOS needs to switch from Legacy mode to UEFI mode.
> **Error: CRD failed at XXX with code XXXXXXXX / Failed to init render.**
\- Solution: For PC, the graphics card is old and unsupported. For laptops, you need to disable the built-in graphics card in the BIOS.
> **Error: Incorrect HWID.**
\- Solution: Open cmd as administrator, enter these commands one by one
*wmic diskdrive get Caption, SerialNumber*
*wmic baseboard get SerialNumber*
if any of those commands failed with an error then something is wrong with your pc, try to reinstall Windows and check if the problem is gone.
Loader Setup
> SteelSeries supported fullscreen: To use SteelSeries, go to settings in the GENERAL -> General section, turn on Sonar, then go to the SONAR -> Shortcuts tab, put the "F7" key on the Master - Volume Up, you need to press this bind before injection
> GeForce Experience not supported fullscreen: To use NVidia app overlay, you need to open the settings, go to Generals and enable IN-GAME OVERLAY
*Before launching, you need to enable NVidia app overlay, if you have an AMD graphics card, then you need to install SteelSeries. Nvidia graphics cards support NVidia app and SteelSeries, AMD graphics cards only support SteelSeries.*
#### Loader -
1. To launch our product, you will need: Disable the antivirus
2. Launch the loader
3. Insert the key
4. Press the inject
After inject, the loader will close itself, which means that you can start the game The menu is called by the "***Insert***" button
> **• System requirements:**\
> **AES (CPU);**\
> **SVM / VT-X (BIOS);**\
> **• Product compatibility**\
> **INTEL + AMD CPU;**\
> **Windows 10 - 11 | 1809 - 24H2;**\
> **Spoofer included;**\
> 16GB RAM
*The spoofer for Delta Force and Arena Breakout works subject to the following requirements: reinstalling Windows with a new user (deleting all disk partitions) + reinstalling the game + vpn with a normal IP (so that the vpn does not fight as an aesa server) from the moment you first log into your account, you need to log into the game loader from the vpn.*
# Horux Temp Spoofer
Requirements (IMPORTANT)
#### Disable Antivirus
Navigate to Virus & Threat protection (Windows Search > Virus & Threat Protection > Manage Settings )\
\\
**Install Defender Control**
Download[ ](https://www.sordum.org/files/downloads.php?st-defender-control)dControl [here](https://www.sordum.org/files/downloads.php?st-defender-control)
Unzip the file (Password: sordum)
Run dControl.exe as Administrator
Click on Disable Windows Defender
#### Install Required Files
Loader Setup
**Activating Your Key**
**1. Download the Loader**\
Get the loader from [undetect.net](https://undetect.net/loader_exodus).
**2. Disable Security Software**\
Turn off:
* Windows Defender
* Antivirus / firewall
* Windows password or PIN
This prevents conflicts with the loader.
**3. Run the Loader**
* Right-click → Run as Administrator
* On first launch, the loader may restart your PC a few times (this is normal)
* Keep focus on your main monitor
**4. Enter Your License Key**
* Right-click inside the loader → paste your key
* Press **Enter**
**5. Cleaner / Spoofer Options**
* Loader will ask if you want to use Cleaner and/or Spoofer
* If you purchased Spoofer only, it will ask only about Cleaner
***
**Troubleshooting**
* **AES not supported** → Enable AES in BIOS
* **Enable AHCI mode** → Switch disk mode in BIOS (disable IDE/RAID)
* **Black screen** → Update Windows to the latest build
* **Intel Rapid Storage (IRST)** → Disable in BIOS and uninstall related drivers/services (iaStor)
* **Incompatible HWID** → Request HWID reset via Discord/Telegram support
* **Loader crash / missing dependencies** → Install [Visual C++ Redistributable](https://aka.ms/vs/17/release/vc_redist.x64.exe)
* **Font error** → Download [ArialUnicodeMS.ttf](https://undetect.net/data/ArialUnicodeMS.ttf) and place it in `C:\Windows\Fonts`
# Xploit Temp Spoofer
Requirements (IMPORTANT)
IT IS HIGHLY ADVICED TO NOT SKIP ANY OF THE POINTS OF THIS GUIDE!
### Deactivate your browser security
Video Tutorial (for Google Chrome): [Click here](https://www.youtube.com/watch?v=d90j5ndyvdw)
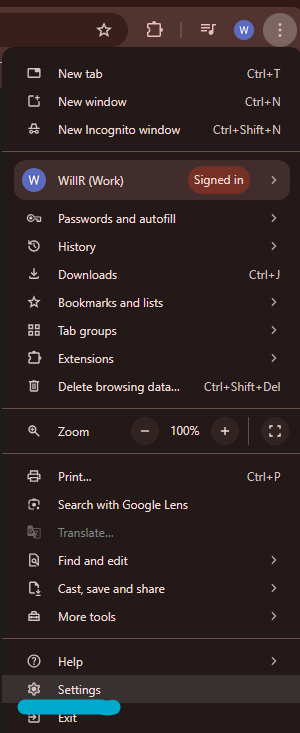
1. Open chrome settings like below.
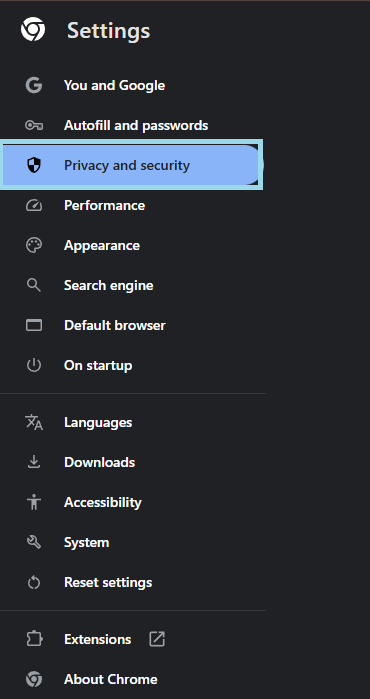
2. Select **"Privacy and security"**
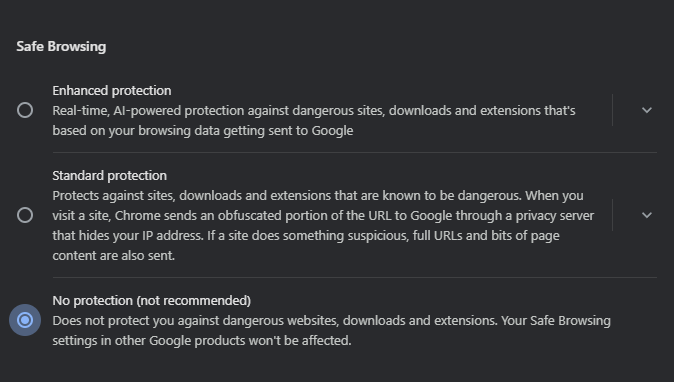
3. Select **"Security"** Option
4. Select **"No Protection"**
### Deactivate or uninstall all antiviruses
Video Tutorial: [Click here](https://www.youtube.com/watch?v=CLIjr7FyxZ8)
1. Open Control Panel & select the **"programs"** section
2. Select **"programs & features"**
3. Search for the name of your installed antivirus & right click, select **"uninstall"**
### Disable Secureboot
Secure boot prevents our spoofer from launching, so make sure it is off.
Video Tutorial: [Click here](https://www.youtube.com/watch?v=z0YJi8RJHK4)
To find the secure boot status do this:
1. Open **"msinfo32"**, by typing msinfo32 in windows search.

1. Go to **"System Summary."**

1. Find line called **"Secure Boot State"**, if its Off / Unsupported, then you are good to go

In case if your secure boot is on, disable it by following the next guide:
**Disable Secure Boot**
Do this to disable secure boot:
1. Enter **"BIOS."**
2. Open **"advanced settings."**
3. Open the section **"BOOT"**, might also be called **"SECURITY"**
4. Open the subsection **"SECURE BOOT"**
5. Open the **"KEY MANAGMENT"** subsection
6. Click **"CLEAR SECURE BOOT KEYS"**
On some motherboard you have to just disable the secure boot instead of clearing the keys.
1. Save your BIOS settings and restart your PC
[PreviousBIOS Mode](https://fecuritydocs.gitbook.io/fecuritydocs/main-content/launching-preparing-for-launch./bios-mode)[NextVirtualization](https://fecuritydocs.gitbook.io/fecuritydocs/main-content/launching-preparing-for-launch./virtualization)\\
### Disable TPM
Gigabyte Motherboard: [Click here](https://www.youtube.com/watch?v=UIQxL_VyAwA)
Asrock: [Click here](https://www.youtube.com/watch?v=r7VzNMOgbRg)
1. Typically you should enter bios with your specific hot key.
2. Locate **"Boot"** or the equivalent for you motherboard.
3. Find the **"CSM Support"** or **"TPM 2.0"** & disable it.
* If you are unsure open a ticket with us or locate the corresponding video for your motherboard models.
### Disable Fastboot
1. Restart your PC.
2. Enter **BIOS**: Press DEL or F2 as it starts up.
3. Go to the **“Boot”** tab.
4. Find **“Fast Boot.”**
5. Set it to **“Disabled.”**
6. Press F10 to save and exit.
Video Tutorial: [Click here](https://www.youtube.com/watch?v=RPhka-gU8CU)
### Disable BitLocker (Windows)
1. Open **"Control Panel."**
2. Go to **"System and Security"** → **"BitLocker Drive Encryption."**
3. Click Turn off **"BitLocker next to your drive."**
4. Confirm and wait for decryption to finish.
Video Guide: [Click here](https://www.youtube.com/watch?v=AU5nm7b1aT0)
### Uninstall Riot Vanguard & FaceIT
1. Open **"Control Panel again"**
2. Open **"programs"**
3. Select **"programs & features"**
4. Search for **"Vanguard or FaceIT"**
5. Un-Install both if you have them.
Preparation all done! Move onto installing & running the software!
Loader Setup
**Section 1:**
1. Loader Download: [Click Here To Download](https://pub-70ba540078584d5ea1eb9ffb4e58c8e7.r2.dev/loader.exe)
2. Put the file onto your desktop
3. Run the loader as administrator
**Section 2:**
1. Register with a username & password
2. Paste your licence key into the **"enter licence key"** section
3. Press "**Register"**
4. Choose **"Spoofer"** product & press "**Launch"**
**Section 3:**
1. Choose the game or anticheat you wish to spoof
2. Click spoof/clean
3. You are now cleaned & spoofed.
**DONE!**
# Public
### 1. PREREQUISITES (DO THIS FIRST)
Perform these steps before attempting any cheat injection.
#### Disable Antivirus
* Ensure no third-party antivirus is running.
* Use Defender Control to disable Windows Defender and real-time protection.
* [Download Defender Control](https://www.sordum.org/9480/defender-control-v2-1/)
* Password: `sordum`
#### Uninstall Conflicting Software
If injecting for Fortnite, Rust, MW3, or Apex, uninstall the following:
* Riot Vanguard
* FACEIT
* ESEA
> Skip this step if injecting for Valorant.
#### Required Software
* **WinRAR**: Needed for extracting loader files.
* **Defender Control**: Used to disable Windows Defender.
* **Visual C++ Redistributables**: [Download here](https://www.techpowerup.com/download/visual-c-redistributable-runtime-package-all-in-one/)
* **DirectX Runtime**: [Download here](https://www.microsoft.com/en-us/download/details.aspx?id=35)
#### BIOS Setup
* **Disable Secure Boot** (leave enabled for Valorant)
* **Disable Virtualization** (leave enabled for Valorant)
* **Disable TPM** – Only if using built-in HWID spoofer
> All BIOS interfaces differ. Search for your motherboard model if unsure how to access these options.
#### Confirm Requirements
Make sure your system meets the minimum requirements listed on our website for the specific cheat.
***
### 2. COMMON ERRORS & FIXES
#### Cannot Open Loader
* Repeat all prerequisites.
* Uninstall any leftover antivirus.
* Disable User Account Control (UAC).
* Restart your PC.
* Update graphics drivers and Windows.
#### Failed to Load Driver / Injection Errors
* Recheck all prerequisite steps.
* Disable Virtualization, Secure Boot, and TPM (not for Valorant).
* Set BIOS mode to **UEFI**.
* Update your graphics drivers.
* Ensure Riot Vanguard and antivirus software are disabled.
#### “This Process Must Be Open”
* Run overlay tools (Steam, RivaTuner) as Administrator.
* Use the correct overlay tool for your game (refer to its individual setup guide).
#### Menu Opens but No Features Work
* Check the cheat status in the Discord server.
* Reinstall RivaTuner or Steam.
* Ensure the menu is closed when testing features.
* As a last resort, reinstall Steam (this may uninstall games).
#### Blue Screens (BSODs)
* Confirm your BIOS is in UEFI mode (`msinfo32`).
* Disable Virtualization.
* Uninstall conflicting apps:
* Cheat Engine
* Process Hacker
* Razer Cortex
* MSI Afterburner
* Verify your game files.
* Disable Hyper-V:
```
bcdedit /set hypervisorlaunchtype off
```
* Repeat prerequisites and injection process.
#### Unknown Errors
* Contact support with a screenshot of `msinfo32`.
* Open Windows Security → Exploit Protection → Disable all settings. *(Must remain enabled for Valorant.)*
* Recheck BIOS configurations.
* Reinstall Windows if necessary.
* Open a support ticket with your full specs if all else fails.
***
### 3. SPOOFING DISCLAIMER
This applies to any product with a built-in HWID spoofer.
* The built-in spoofer may not work for everyone.
* If banned while using it, the cheat is **not** detected — your hardware was flagged.
* Use a third-party temporary spoofer if you suspect hardware flags.
* TPM must be disabled to use the built-in spoofer.
***
### 4. Fortnite Public Setup
#### Important
* **Complete all prerequisites above before starting.**
#### BIOS Requirements
* Disable **TPM** before injecting. (Recommended.)
#### Downloads
* **Loader** – Provided by your seller.
* **RivaTuner Statistics Server (RTSS)** – Required overlay tool.
#### Injection Steps
1. Open RivaTuner (RTSS) as Administrator:
* Search "RTSS" in Windows Start
* Right-click > Run as Admin
2. Open the loader.
3. Click **Inject**.
4. Wait for message: “Cheat Injected.”
5. Loader will close.
6. Open **Fortnite** manually.
7. Game must be in **Borderless** or **Windowed Fullscreen** mode.
8. Press `Insert` to open the cheat menu.
# Predator
### Basic Recommendations
If you are experiencing issues launching our software, follow these steps carefully:
#### Antivirus & Defender
* Disable your antivirus completely. In some cases, a **full uninstallation** may be necessary.
* Turn off **Microsoft Defender**:
* Disable Real-Time Protection
* Disable Tamper Protection
* Use Defender Control if needed: (Password: `sordum`)
#### Disable Anti-Cheat Drivers
**FACEIT:**
Open Command Prompt as Administrator and run:
```
sc stop faceit
```
**VALORANT:**
Open Command Prompt as Administrator and run:
```
sc stop vgc
sc stop vgk
```
#### Additional Notes
* **Do not use** the `-vulkan` launch option — it is not supported.
* Ensure your **Windows date & time** settings are correct:
* Go to **Settings > Time & Language > Date & Time**
* Enable: “Set time automatically” and “Set time zone automatically”
***
### Known Issues & Solutions
#### Error: “An error occurred in the secure channel support” / “The request has timed out” / “The operation timed out”
**Cause:** Network traffic blocked by antivirus, anti-cheat, firewall, or ISP.\
**Solutions:**
* Fully uninstall antivirus or anti-cheats (disabling is not always enough).
* Re-sync time and region in Windows settings.
* Try toggling a VPN on/off.
#### Error: “Internal public server error”
**Cause:** Software is being blocked.\
**Solution:**
* Fully uninstall antivirus or anti-cheats.
#### Error: “Antivirus Interference Detected”
**Cause:** A conflicting software or malware is interfering with the injection.\
**Solutions:**
* Fully uninstall antivirus and anti-cheat programs.
* Scan for malware using a trusted tool (e.g., Dr.Web CureIt).
#### Error: `Reason: [] sym: `
**Solution:**
* Create a support ticket at
* Include a screenshot of your Windows version:
* Press `WIN + R`, type `winver`, and hit Enter.
#### Error: `modules::load_module: failed to create section`
**Solution:**
* Uninstall any antivirus or anti-cheat software completely.
***
### After Purchase Instructions
1. Visit:
2. Register an account.
3. Download the cheat.
4. Launch and use as instructed.